How to create lines on a whiteboard

How to create lines on a whiteboard
Whiteboards are so popular these days since replacing the traditional chalkboard and with a multitude of styles and sizes to choose from theres never been a better time to purchase one. However, often you'll need to create lines on your whiteboard in order to make the most of it and it's intended purpose.
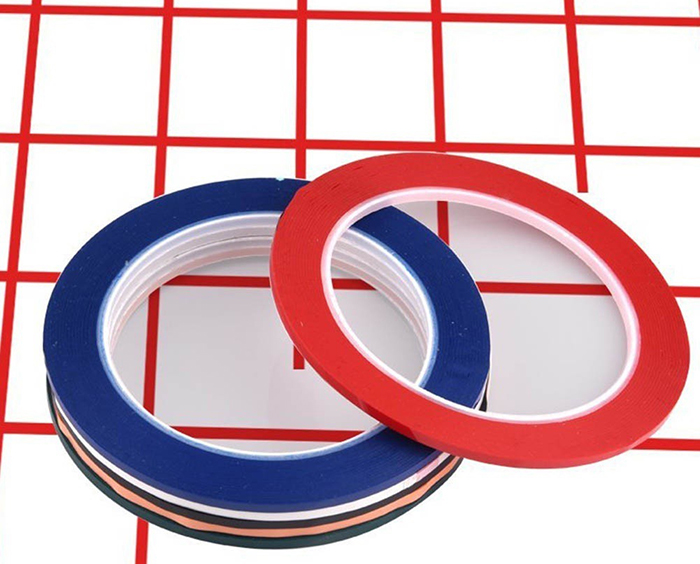
Quite simply you can create lines on a whiteboard using self adhesive whiteboard tape, whiteboard magnetic tape or permanent maker pen. Each of these three options are suitable solutions but by far the most popular and best way to create perfect lines is with whiteboard tape.

Preparation is key
Making sure your whiteboard is ultra clean and free from dust and pen marks is very important before embarking on creating lines on a whiteboard using tape.
Read more: The Step-by-Step Guide to Cleaning Your Office Whiteboard
Achieving great lines with your whiteboard tape
Whiteboard tape is exceedingly sticky. If it’s stuck to your whiteboard in the wrong place, everything will be off-centre, and tape can be difficult to remove entirely. The last thing any professional wants when creating a tape grid or sectioning off part of their whiteboard is to have sticky residue that takes too much time to get rid of.
To combat this, it’s best to create perfect lines straight off the bat. There are a few tricks to help you achieve these lines with little to no effort at all.
Thicker tape is easier to use than thin tape. Thin tape can get stuck together and it’s harder to create straight lines with it because it’s harder to tell where you’re putting the tape at first. With wider whiteboard tape, you can easily create a grid.

Keeping the lines straight
If you're wondering how to make straight lines on a whiteboard then you must plan your lines in advance, with the help of string and a ruler. By putting string across the board, right next to the place you want your whiteboard tape to go, you can mark out your lines before you put down the sticky tape. String can be removed in moments; tape, not so much.

Applying whiteboard tape freehand
If you decide to apply your whiteboard tape freehand, you’ll need to be very careful and quite meticulous when applying it. Regularly step away from your board to check your progress as you’re putting your chosen tapes on your board. This way, you can be sure that you’ve been able to follow your original plan for your tape lines.

Top tip for applying whiteboard tape
Lay your whiteboard flat before you start putting tape on it. Having the board upright makes it harder to judge where the tape is lying. On that note, don’t stretch the tape while you’re applying it. Smooth it down onto your board’s surface as you go, and you’ll also be able to avoid any unsightly bumps in the tape as you apply it. Carefully rub the tape down to make it stick. In addition you could even make a mock grid on paper to follow on your board by printing off a guide and cutting out the parts you want to tape on the board.

How to grid a whiteboard
Often you may require more than just the odd line here & there and want to have horizontal and vertical lines to create columns and rows. Creating a grid on your whiteboard can also be achieved using whiteboard gridding tape. Following the tips and advise above for measuring and applying your gridding tape and consider using different thickness (width) of whiteboard tape to help distinguish different columns and may be consider using different colours of tape to create your gridded rows.

Buying Gridded Whiteboards
One of the best ways of producing your perfect lined whiteboard using tape is to purchase a whiteboard that already comes with a pre-printed gridded surface.
These Dual Faced Whiteboards come as a double sided non-magnetic whiteboard, whereby one side is plain and the other side has a guideline grid printed onto the surface. This printed guideline is a very feint 20mm square grid that is only seen close up when writing on the board, aiding in writing and drawing neatly, and is unseen by the audience from just a few feet away.

You can easily use this grid as a guide for applying your whiteboard tape and achieving a neat & tidy uniformed gridded whiteboard.
Drawing lines on a whiteboard with permanent maker pen
Permanent marker pens (also known as “Sharpies”) are a common solution to creating lines on a whiteboard as they are cheap and easily accessible and come in many colours and tip thicknesses. However, we at red17 dont believe that using permanent maker pens is the best option for your whiteboard and here's why...
- A constant flow of ink is rare, especially if the whiteboard is already mounted to the wall, thus causing gaps in the lines and darker & lighter parts of the line that doesn't look good.
- Drawing lines freehand is very tricky indeed and requires a steady hand and nerves of steel
- Using a ruler or straight edge can help with getting your lines straight and even, but note that often when drawing a line with a pen & ruler the line can easily smudge as you remove the ruler from the whiteboard. TIP: Once you have completed drawing the line, leave the ruler in place for several seconds and even blow the ink to ensure it's dry before removing the ruler. With any luck you may avoid smudging.
- Changing your mind or needing to alter the design of your lined whiteboard becomes difficult and can end up meaning you need to purchase a new whiteboard.
- Making a mistake is hard to undo. Check out this blog we have produced on How to Remove Permanent Marker Once and For All.

Printed Whiteboard Planners
Here at red17 we sell whiteboards and whiteboard accessories for you to create your own bespoke whiteboards using tapes and pens, but we also offer a range of printed whiteboards with various weekly, monthly and yearly planners already printed onto the surface and ready to use.

Shop here:
Great idea to create a grid on board. Thanks for sharing it and please visit officeworks whiteboards
ReplyDelete